Fork me on GitHub

Lombok使用说明

Published on:
Tags: Lombok Java

一、项目背景

在写Java程序的时候经常会遇到如下情形:

新建了一个Class类,然后在其中设置了几个字段,最后还需要花费很多时间来建立getter和setter方法

lombok项目的产生就是为了省去我们手动创建getter和setter方法的麻烦,它能够在我们编译源码的时候自动帮我们生成getter和setter方法。即它最终能够达到的效果是:在源码中没有getter和setter方法,但是在编译生成的字节码文件中有getter和setter方法

比如源码文件:

import java.io.Serializable;
import lombok.AllArgsConstructor;
import lombok.Data;
import lombok.NoArgsConstructor;
import lombok.extern.slf4j.Slf4j;
 
@Data
@Slf4j
@NoArgsConstructor
@AllArgsConstructor
public class TestUserVo implements Serializable{
    private static final long serialVersionUID = -5648809805573016853L;
    private Long id;
    private Long userId;
    /**
     * 获取 id
     * @return the id
     */
    public Long getId() {
        System.out.println("getId");
        return id;
    }
    /**
     * 设置 id
     * @param id the id to set
     */
    public void setId(Long id) {
        System.out.println("setId");
        this.id = id;
    }
}

以下是编译上述源码文件得到的字节码文件,对其反编译得到的结果

import java.io.Serializable;
import java.beans.ConstructorProperties;
import java.io.PrintStream;
import org.slf4j.Logger;
import org.slf4j.LoggerFactory;
 
public class TestUserVo implements Serializable {
    public String toString() {
        return "TestUserVo(id=" + getId() + ", userId=" + getUserId() + ")";
    }
 
    public int hashCode() {
        int PRIME = 59;
        int result = 1;
        Object $id = getId();
        result = result * 59 + ($id == null ? 43 : $id.hashCode());
        Object $userId = getUserId();
        result = result * 59 + ($userId == null ? 43 : $userId.hashCode());
        return result;
    }
 
    public void setUserId(Long userId) {
        this.userId = userId;
    }
 
    public boolean equals(Object o) {
        if (o == this) {
            return true;
        }
        if (!(o instanceof TestUserVo)) {
            return false;
        }
        TestUserVo other = (TestUserVo) o;
        if (!other.canEqual(this)) {
            return false;
        }
        Object this$id = getId();
        Object other$id = other.getId();
        if (this$id == null ? other$id != null : !this$id.equals(other$id)) {
            return false;
        }
        Object this$userId = getUserId();
        Object other$userId = other.getUserId();
        return this$userId == null ? other$userId == null : this$userId.equals(other$userId);
    }
 
    protected boolean canEqual(Object other) {
        return other instanceof TestUserVo;
    }
 
    private static final Logger log = LoggerFactory.getLogger(TestUserVo.class);
    private static final long serialVersionUID = -5648809805573016853L;
    private Long id;
    private Long userId;
 
    @ConstructorProperties({ "id", "userId" })
    public TestUserVo(Long id, Long userId) {
        this.id = id;
        this.userId = userId;
    }
 
    public Long getUserId() {
        return this.userId;
    }
 
    public Long getId() {
        System.out.println("getId");
        return this.id;
    }
 
    public void setId(Long id) {
        System.out.println("setId");
        this.id = id;
    }
 
    public TestUserVo() {
    }
}

为什么推荐使用它呢,因为我们一般写一个pojo时很容易遗漏(equalstoStringhashCodecanEqual)这几个方法,使用Lombok不但可以在编译的时候自动生成gettersetter方法还会根据字段来生成(equalstoStringhashCodecanEqual)这几个方法.

Lombok在生成gettersetter方法时不会覆盖我们源码中已经编写的gettersetter方法,所以可以大胆的使用。

下面介绍几个常用的 lombok 注解:

@Data :注解在类上;提供类所有属性的 gettingsetting 方法,此外还提供了equalscanEqualhashCodetoString 方法

@Setter:注解在属性上;为属性提供 setting 方法

@Getter:注解在属性上;为属性提供 getting 方法

@Log4j | @Slf4j | @Log :注解在类上;为类提供一个 属性名为loglog4j | SLF4j | Log(java logging)日志对象

@NoArgsConstructor:注解在类上;为类提供一个无参的构造方法

@AllArgsConstructor:注解在类上;为类提供一个全参的构造方法

其他的查看官网的文档:https://projectlombok.org/features/all

二、使用方法

Maven依赖:

<dependency>
  <groupId>org.projectlombok</groupId>
  <artifactId>lombok</artifactId>
  <version>lombok</version>
</dependency>

ps.版本为:1.16.18,并且scope为:provided,我们只在编译时使用。

使用lombok项目的方法很简单,分为四个步骤:

1)在需要自动生成类上,加上自动生成注解(@Data@Setter@Getter@Log4j@Slf4j@Log@NoArgsConstructor@AllArgsConstructor,等等)

2)在编译类路径中加入lombok.jar包 ,maven中添加依赖

3)使用支持lombok的编译工具编译源代码(关于支持lombok的编译工具,见“四、支持lombok的编译工具”)

4)编译得到的字节码文件中自动生成相应配置的代码

三、原理分析

接下来进行lombok能够工作的原理分析,以Oraclejavac编译工具为例。

自从Java 6起,javac就支持“JSR 269 Pluggable Annotation Processing API”规范,只要程序实现了该API,就能在javac运行的时候得到调用。

举例来说,现在有一个实现了”JSR 269 API”的程序A,那么使用javac编译源码的时候具体流程如下:

1)javac对源代码进行分析,生成一棵抽象语法树(AST)

2)运行过程中调用实现了”JSR 269 API”的A程序

3)此时A程序就可以完成它自己的逻辑,包括修改第一步骤得到的抽象语法树(AST)

4)javac使用修改后的抽象语法树(AST)生成字节码文件

详细的流程图如下: 流程图 lombok本质上就是这样的一个实现了”JSR 269 API”的程序。在使用javac的过程中,它产生作用的具体流程如下:

1)javac对源代码进行分析,生成一棵抽象语法树(AST)

2)运行过程中调用实现了”JSR 269 API”的lombok程序

3)此时lombok就对第一步骤得到的AST进行处理,找到@Data注解所在类对应的语法树(AST),然后修改该语法树(AST),增加gettersetter方法定义的相应树节点

4)javac使用修改后的抽象语法树(AST)生成字节码文件

四、支持lombok的编译工具

  1. 由“三、原理分析”可知,Oracle javac直接支持lombok
  2. 常用的项目管理工具Maven所使用的java编译工具来源于配置的第三方工具,如果我们配置这个第三方工具为Oracle javac的话,那么Maven也就直接支持lombok
  3. Intellij Idea中配置,可以下载安装Intellij Idea中的”Lombok plugin”。
  4. Eclipse中配置lombok支持(或者使用官方的plugin:https://projectlombok.org/setup/eclipse
    1. 去官网下载:http://projectlombok.org/
    2. eclipse / myeclipse 手动安装 lombok
    3. 将 lombok.jar 复制到 myeclipse.ini / eclipse.ini 所在的文件夹目录下
    4. 打开 eclipse.ini / myeclipse.ini,在最后面插入以下两行并保存:
    5. -Xbootclasspath/lombok.jar -javaagent:lombok.jar
    6. 重启 eclipse / myeclipse 如上配置后,在类以后用上无需书写gettersetter程序中也可以直接引用gettersetter方法 其他IDE支持,请去官网:https://projectlombok.org/ 点击Install选择不同的IDE插件安装说明

五、lombok的罪恶

使用lombok虽然能够省去手动创建settergetter方法的麻烦,但是却大大降低了源代码文件的可读性和完整性,降低了阅读源代码的舒适度。

Fastdfs安装说明与常见问题解决

Published on:
Tags: fastdfs

Fastdfs安装说明与常见问题解决

docker中安装

docker pull season/fastdfs
docker tag season/fastdfs 192.168.0.34:5000/season/fastdfs
docker push 192.168.0.34:5000/season/fastdfs

启动会获取tracker ip 192.168.0.54:22122

monitor检测

/usr/local/bin/fdfs_monitor /etc/fdfs/storage.conf

storage store_path0路径与base_path路径必须不同

物理机安装

1.安装git

yum install -y git

2.下载fastdfs源码

git clone https://github.com/happyfish100/fastdfs.git
git clone https://github.com/happyfish100/libfastcommon.git
git clone https://github.com/happyfish100/fastdfs-nginx-module.git

3.下载nginx

cp /home/jyftp/nginx-1.10.1.tar.gz ./
tar -xvf nginx-1.10.1.tar.gz 
rm -rf nginx-1.10.1.tar.gz 
chown -R root.root nginx-1.10.1/
mv nginx-1.10.1/ nginx

4.安装libfastcommon (fastdfs依赖的系统库)

cd /usr/local/fastdfs/libfastcommon
./make.sh
./make.sh install

5.安装fastdfs

cd /usr/local/fastdfs/fastdfs
./make.sh
./make.sh install

6.安装nginx

cd /usr/local/nginx
./configure --prefix=/usr/local/nginx --conf-path=/usr/local/nginx/nginx.conf --add-module=/usr/local/fastdfs/fastdfs-nginx-module/src
make 
make install

安装nginx错误处理 错误信息:

./configure: error: the HTTP rewrite module requires the PCRE library. 

安装pcre-devel与openssl-devel解决问题,执行下面命令

yum -y install pcre-devel openssl openssl-devel

错误信息:

/data/soft/fastdfs-nginx-module/src/ngx_http_fastdfs_module.c:894: 错误:‘struct fdfs_http_context’没有名为‘if_modified_since’的成员
/data/soft/fastdfs-nginx-module/src/ngx_http_fastdfs_module.c:897: 错误:‘struct fdfs_http_context’没有名为‘if_modified_since’的成员
/data/soft/fastdfs-nginx-module/src/ngx_http_fastdfs_module.c:927: 错误:‘struct fdfs_http_context’没有名为‘range’的成员
/data/soft/fastdfs-nginx-module/src/ngx_http_fastdfs_module.c:933: 错误:‘struct fdfs_http_context’没有名为‘if_range’的成员
/data/soft/fastdfs-nginx-module/src/ngx_http_fastdfs_module.c:933: 错误:‘true’未声明(在此函数内第一次使用)
make[1]: *** [objs/addon/src/ngx_http_fastdfs_module.o] 错误 1
make[1]: Leaving directory `/data/soft/nginx-1.8.0'
make: *** [build] 错误 2

解决办法 执行以下2条命令,然后重新make

ln -sv /usr/include/fastcommon /usr/local/include/fastcommon
ln -sv /usr/include/fastdfs /usr/local/include/fastdfs

拷贝相关文件到/etc/fdfs目录下:

cp /usr/local/fastdfs/fastdfs-nginx-module/src/mod_fastdfs.conf /etc/fdfs/
cp /usr/local/fastdfs/fastdfs/conf/mime.types /etc/fdfs/
cp /usr/local/fastdfs/fastdfs/conf/http.conf /etc/fdfs/
cp /usr/local/fastdfs/fastdfs/conf/anti-steal.jpg /etc/fdfs/

如果是下面错误,需要安装fastdfs最新版,直接从github上下载源码安装

local/fastdfs-nginx-module/src/common.c:1245: 错误:‘FDFSHTTPParams’没有名为‘support_multi_range’的成员
make[1]: *** [objs/addon/src/ngx_http_fastdfs_module.o] 错误 1
make[1]: Leaving directory `/usr/local/nginx-1.10.1'

解决办法:github上下载最新FastDFS master源码,重新编译安装即可。

7.配置fastdfs

7.1 创建数据存放目录(用于存放数据)

cd /usr/local/fastdfs
mkdir fast_data
cd fast_data
tracker基础数据和日志
mkdir tracker
storage基础数据和日志
mkdir storage
storage 数据存放目录
mkdir store_path
fast nginx模块基础数据和日志
mkdir nginx_module

7.2 创建配置文件目录(用于存放使用的配置文件)

mkdir fast_conf
cd /usr/local/fastdfs/fastdfs/conf
cp ./* /usr/local/fastdfs/fast_conf/

7.3 配置tracker

编辑basepath
#basepath(用于存放tracker的基本数据,包括日志)
base_path=/usr/local/fastdfs/fast_data/tracker

7.4 配置storage

修改如下配置:
#用于存储storage基本数据的目录(包括日志)
base_path=/usr/local/fastdfs/fast_data/storage
#数据存放的目录
store_path0=/usr/local/fastdfs/fast_data/store_path
#group的名字
group_name=group1
# tracker地址
tracker_server=10.30.193.163:22122
这个是tracker的ip地址和端口号

tracker_server=192.168.0.48:22122

7.5 修改nginx相关的fastdfs配置文件

将nginx module的配置文件拷贝到fastdfs的配置目录

cp /usr/local/fastdfs/fastdfs-nginx-module/src/mod_fastdfs.conf /usr/local/fastdfs/fast_conf

修改mod_fastdfs.conf

#存放日志等文件
base_path=/usr/local/fastdfs/fast_data/nginx_module
#tracker的地址(这个是nginx中的plugin使用的)
tracker_server=192.168.0.48:22122
#本地对应的group名字(当前nginx对应的storage存储的group的名字)
group_name=group1
#这个配置用于说明nginx对应的storage存储文件的实际位置
store_path0=/usr/local/fastdfs/fast_data/store_path
#这个是url是否需要带groupname
url_have_group_name = true

9. 编写启动脚本

cd /usr/local/fastdfs

9.1 创建 启动文件目录

mkdir bin

tracker的启动脚本

9.2 在bin目录下,创建tracker.sh
#!/bin/sh

case "$1" in

    start) 
	/usr/local/fastdfs/fastdfs/tracker/fdfs_trackerd /usr/local/fastdfs/fast_conf/tracker.conf
    ;;
    stop) 
	/usr/local/fastdfs/fastdfs/tracker/fdfs_trackerd /usr/local/fastdfs/fast_conf/tracker.conf stop
    ;;
    restart)
	/usr/local/fastdfs/fastdfs/tracker/fdfs_trackerd /usr/local/fastdfs/fast_conf/tracker.conf restart 
    ;;

esac   

# tailf /usr/local/fastdfs/fast_data/tracker/logs/trackerd.log

exit 0

将文件变成可执行

chmod +x tracker.sh
9.3 在bin目录下,创建storage.sh
#!/bin/sh

case "$1" in

    start)
	/usr/local/fastdfs/fastdfs/storage/fdfs_storaged /usr/local/fastdfs/fast_conf/storage.conf 
    ;;
    stop)
	/usr/local/fastdfs/fastdfs/storage/fdfs_storaged /usr/local/fastdfs/fast_conf/storage.conf stop 
    ;;
    restart)
	/usr/local/fastdfs/fastdfs/storage/fdfs_storaged /usr/local/fastdfs/fast_conf/storage.conf restart
    ;;

esac   

# tailf /usr/local/fastdfs/fast_data/storage/logs/storaged.log

exit 0

将文件变成可执行

chmod +x storage.sh
9.4 配置、启动nginx

修改mod_fastdfs.conf配置文件

cd /usr/local/fastdfs/fast_conf/
vi mod_fastdfs.conf
# FastDFS tracker_server can ocur more than once, and tracker_server format is
#  "host:port", host can be hostname or ip address
# valid only when load_fdfs_parameters_from_tracker is true
tracker_server=192.168.0.48:22122

# the port of the local storage server
# the default value is 23000
storage_server_port=23000

# if the url / uri including the group name
# set to false when uri like /M00/00/00/xxx
# set to true when uri like ${group_name}/M00/00/00/xxx, such as group1/M00/xxx
# default value is false
url_have_group_name = true

# store_path#, based 0, if store_path0 not exists, it's value is base_path
# the paths must be exist
# must same as storage.conf
store_path0=/usr/local/fastdfs/fast_data/store_path
#store_path1=/home/yuqing/fastdfs1

copy配置文件到 /etc/fdfs

cd /usr/local/fastdfs/fast_conf/
cp anti-steal.jpg http.conf mime.types mod_fastdfs.conf /etc/fdfs/

修改nginx的配置文件

cd /usr/local/nginx
vi nginx.conf
server {
listen 8079;
	location ~/M00 {
	    root /usr/local/fastdfs/fast_data/store_path/data;
	    ngx_fastdfs_module;
	}
}

创建软连接

ln -s /usr/local/fastdfs/fast_data/store_path/data /usr/local/fastdfs/fast_data/store_path/data/M00

启动nginx之前先-t检查一下配置文件是否有错误

/usr/local/nginx/sbin/nginx -t

输出一下信息表示正确

[root@localhost bin]# /usr/local/nginx/sbin/nginx -t
ngx_http_fastdfs_set pid=125936
nginx: the configuration file /usr/local/nginx/nginx.conf syntax is ok
nginx: configuration file /usr/local/nginx/nginx.conf test is successful

启动nginx

/usr/local/nginx/sbin/nginx

启动 Nginx 后会打印出fastdfs模块的pid,看看日志是否报错,正常不会报错的

[root@localhost fdfs]# /usr/local/nginx/sbin/nginx
ngx_http_fastdfs_set pid=126276

遇到的错误

错误:

ERROR - file: storage_ip_changed_dealer.c, line: 186, connect to tracker server 172.0.0.1:22122 fail, errno: 110, error info: Connection timed out

防火墙中打开tracker服务器端口( 默认为 22122)

vi /etc/sysconfig/iptables 

附加:若/etc/sysconfig 目录下没有iptables文件可随便写一条iptables命令配置个防火墙规则:如:

iptables -P OUTPUT ACCEPT

然后用命令:service iptables save 进行保存,默认就保存到 /etc/sysconfig/iptables 文件里。这时既有了这个文件。防火墙也可以启动了。接下来要写策略,也可以直接写在/etc/sysconfig/iptables 里了。 添加如下端口行:

-A INPUT -m state --state NEW -m tcp -p tcp --dport 22122 -j ACCEPT 
-A INPUT -m state --state NEW -m tcp -p tcp --dport 23000 -j ACCEPT 
-A INPUT -m state --state NEW -m tcp -p tcp --dport 8079 -j ACCEPT 
# 22122 tracker 端口
# 23000 storage 端口
# 8079 nginx listen端口

重启防火墙

service iptables restart

Fastdfs Client测试

执行命令

/usr/bin/fdfs_test /usr/local/fastdfs/fast_conf/client.conf  upload /usr/local/fastdfs/fast_conf/

输出

This is FastDFS client test program v5.11

Copyright (C) 2008, Happy Fish / YuQing

FastDFS may be copied only under the terms of the GNU General
Public License V3, which may be found in the FastDFS source kit.
Please visit the FastDFS Home Page http://www.csource.org/ 
for more detail.

[2017-05-16 14:03:07] DEBUG - base_path=/usr/local/fastdfs/fast_data, connect_timeout=30, network_timeout=60, tracker_server_count=1, anti_steal_token=0, anti_steal_secret_key length=0, use_connection_pool=0, g_connection_pool_max_idle_time=3600s, use_storage_id=0, storage server id count: 0

tracker_query_storage_store_list_without_group: 
	server 1. group_name=, ip_addr=192.168.0.48, port=23000

group_name=group1, ip_addr=192.168.0.48, port=23000
storage_upload_by_filename
group_name=group1, remote_filename=M00/00/00/wKgAMFkalhuARwsaAAAFvLZ-36489.conf
source ip address: 192.168.0.48
file timestamp=2017-05-16 14:03:07
file size=1468
file crc32=3061768110
example file url: http://192.168.0.48/group1/M00/00/00/wKgAMFkalhuARwsaAAAFvLZ-36489.conf
storage_upload_slave_by_filename
group_name=group1, remote_filename=M00/00/00/wKgAMFkalhuARwsaAAAFvLZ-36489_big.conf
source ip address: 192.168.0.48
file timestamp=2017-05-16 14:03:08
file size=1468
file crc32=3061768110
example file url: http://192.168.0.48/group1/M00/00/00/wKgAMFkalhuARwsaAAAFvLZ-36489_big.conf

查看Fastdfs集群监控信息

执行命令

/usr/bin/fdfs_monitor /usr/local/fastdfs/fast_conf/client.conf

输出

[2017-05-16 14:17:38] DEBUG - base_path=/usr/local/fastdfs/fast_data, connect_timeout=30, network_timeout=60, tracker_server_count=1, anti_steal_token=0, anti_steal_secret_key length=0, use_connection_pool=0, g_connection_pool_max_idle_time=3600s, use_storage_id=0, storage server id count: 0

server_count=1, server_index=0

tracker server is 192.168.0.48:22122

group count: 1

Group 1:
group name = group1
disk total space = 46161 MB
disk free space = 33446 MB
trunk free space = 0 MB
storage server count = 1
active server count = 1
storage server port = 23000
storage HTTP port = 8888
store path count = 1
subdir count per path = 256
current write server index = 0
current trunk file id = 0

	Storage 1:
		id = 192.168.0.48
		ip_addr = 192.168.0.48  ACTIVE
		http domain = 
		version = 5.11
		join time = 2017-05-16 11:40:48
		up time = 2017-05-16 13:04:57
		total storage = 46161 MB
		free storage = 33446 MB
		upload priority = 10
		store_path_count = 1
		subdir_count_per_path = 256
		storage_port = 23000
		storage_http_port = 8888
		current_write_path = 0
		source storage id = 
		if_trunk_server = 0
		connection.alloc_count = 256
		connection.current_count = 0
		connection.max_count = 2
		total_upload_count = 3
		success_upload_count = 3
		total_append_count = 0
		success_append_count = 0
		total_modify_count = 0
		success_modify_count = 0
		total_truncate_count = 0
		success_truncate_count = 0
		total_set_meta_count = 3
		success_set_meta_count = 3
		total_delete_count = 0
		success_delete_count = 0
		total_download_count = 0
		success_download_count = 0
		total_get_meta_count = 0
		success_get_meta_count = 0
		total_create_link_count = 0
		success_create_link_count = 0
		total_delete_link_count = 0
		success_delete_link_count = 0
		total_upload_bytes = 4738
		success_upload_bytes = 4738
		total_append_bytes = 0
		success_append_bytes = 0
		total_modify_bytes = 0
		success_modify_bytes = 0
		stotal_download_bytes = 0
		success_download_bytes = 0
		total_sync_in_bytes = 0
		success_sync_in_bytes = 0
		total_sync_out_bytes = 0
		success_sync_out_bytes = 0
		total_file_open_count = 3
		success_file_open_count = 3
		total_file_read_count = 0
		success_file_read_count = 0
		total_file_write_count = 3
		success_file_write_count = 3
		last_heart_beat_time = 2017-05-16 14:17:31
		last_source_update = 2017-05-16 14:14:16
		last_sync_update = 1970-01-01 08:00:00
		last_synced_timestamp = 1970-01-01 08:00:00 

Nginx 502 Bad Gateway问题分析与踩过的坑

Published on:

我相信使用Nginx的都会遇到过502 504 这种bad gateway错误,下面我把碰到这个问题分析过程记录并分享出来。

先让我们看一下具体的错误信息

502 Bad Gateway
The proxy server received an invalid response from an upstream server

从字面上的意思理解,nginx从upstream没有接受到信息,第一感觉就是连接被close?还是超时了?超时的话一般错误信息是 timeout

下面是尝试解决这个问题尝试过的手段

1. 第一感觉是proxy返回超时,因此查找nginx官方文档,找到关于proxy的timeout设置

Syntax:	proxy_connect_timeout time;
Default:	
proxy_connect_timeout 60s;
Context:	http, server, location
Defines a timeout for establishing a connection with a proxied server. It should be noted that this timeout cannot usually exceed 75 seconds.

ps. 这个时间不能超过75秒

Syntax:	proxy_read_timeout time;
Default:	
proxy_read_timeout 60s;
Context:	http, server, location
Defines a timeout for reading a response from the proxied server. The timeout is set only between two successive read operations, not for the transmission of the whole response. If the proxied server does not transmit anything within this time, the connection is closed.

ps. 两次read的超时时间,并不是整个的response的超时时间

Syntax:	proxy_send_timeout time;
Default:	
proxy_send_timeout 60s;
Context:	http, server, location
Sets a timeout for transmitting a request to the proxied server. The timeout is set only between two successive write operations, not for the transmission of the whole request. If the proxied server does not receive anything within this time, the connection is closed.

ps. 两次write的超时时间,并不是整个request的超时时间

配置后重启nginx服务进行测试仍然有502错误爆出,继续分析

2. 于是想到了keepalive,分析我们的请求报文头,报文是有keep-alive的头信息

site Architecture 那问题出在哪里?我们应该知道前端请求如果设置为长连接必须要服务端也支持长连接才行,难道是服务器上没有配置长连接导致的?

翻nginx官网找keepalive的相关配置

Syntax:	keepalive_timeout timeout [header_timeout];
Default:	
keepalive_timeout 75s;
Context:	http, server, location
The first parameter sets a timeout during which a keep-alive client connection will stay open on the server side. The zero value disables keep-alive client connections. The optional second parameter sets a value in the “Keep-Alive: timeout=time” response header field. Two parameters may differ.

The “Keep-Alive: timeout=time” header field is recognized by Mozilla and Konqueror. MSIE closes keep-alive connections by itself in about 60 seconds.

ps.长连接保持的超时时间设置

Syntax:	keepalive connections;
Default:	—
Context:	upstream
This directive appeared in version 1.1.4.
Activates the cache for connections to upstream servers.

The connections parameter sets the maximum number of idle keepalive connections to upstream servers that are preserved in the cache of each worker process. When this number is exceeded, the least recently used connections are closed.

ps. 设置upstream长连接的数量

查看tomcat的keepalive的设置

keepAliveTimeout:表示在下次请求过来之前,tomcat保持该连接多久。这就是说假如客户端不断有请求过来,且为超过过期时间,则该连接将一直保持。

maxKeepAliveRequests:表示该连接最大支持的请求数。超过该请求数的连接也将被关闭(此时就会返回一个Connection: close头给客户端)。

以上设置调整后重启服务进行测试,仍然有502错误爆出,继续分析

3. 在nginx的log中发现了请求都是使用的HTTP 1.0,大家应该知道HTTP 1.0是不支持长连接的,于是顺着这条线继续查下去,为什么请求进来都是HTTP1.0呢?

查看nginx官网的文档,发现proxy是可以只定HTTP版本的

Syntax:	proxy_http_version 1.0 | 1.1;
Default:	
proxy_http_version 1.0;
Context:	http, server, location
This directive appeared in version 1.1.4.
Sets the HTTP protocol version for proxying. By default, version 1.0 is used. Version 1.1 is recommended for use with keepalive connections and NTLM authentication.

ps. 1.1.4以后的版本nginx默认使用的是HTTP1.1

于是我们查看一下nginx的版本 nginx -v,我们用的是nginx version: nginx/1.10.1,理论上默认开启的http1.1,不过没关系我们配置一下proxy_http_version 1.1试一下,这个参数要结合上面说道的upstream中的keepalive一起使用才能有效果。

修改好之后重启服务再次进行测试,依然有502的错误爆出,无解!!!,继续分析,为什么版本不生效呢?

我们前端请求的报文:

site Architecture 请求的明明是HTTP 1.1为什么到nginx中成了HTTP 1.0?

于是想到我们使用了阿里云的SLB,会不会是SLB的问题,先测试一下不通过SLB直接访问,查看日志

100.97.90.213 - - [30/Jun/2017:10:44:09 +0800] "GET /api/v1/saleorder?dataSource=&salesStatus=01&shopNo=&carrierAssignStatus=&creTimeBegin=
2017-06-30+00:00:00&creTimeEnd=2017-06-30+23:59:59&salesNo=&status=&carrierStatus=&warehouseStatus=&dataTranslateStatus=&buyerAccount=&changeBuyer=-1
&changeSeller=-1&platformOrderTime=&platformOrderEndTime=&confirmPayTime=&confirmPayEndTime=&receiverMobile=&receiverProvince=&receiverCity=&
receiverArea=&referenceNo=&receiverName=&page=1&pageSize=50&__preventCache=1498790641974 HTTP/1.1" 200 105705 "https://erp-uat.jiuyescm.com/" 
"Mozilla/5.0 (Windows NT 6.1; WOW64) AppleWebKit/537.36 (KHTML, like Gecko) Chrome/50.0.2661.102 Safari/537.36"

日志果然出现了HTTP/1.1,这个让我们找到了希望,但是还有个区别,直接访问走的是ip+port普通的http,slb访问走的是域名而且是ssl,这个会不会跟ssl有关系,于是查询了ssl的http版本支持情况排除了这个问题,那就是继续往SLB上怀疑,翻阿里云负载均衡的说明文档。

让我找到了说明,查看如下信息

site Architecture

找了半天原来是SLB强制转换了协议版本,具体查看阿里云负载均衡的常见问题

问题没有解决,需要咨询阿里云工作人员看对于这类问题是否有好的解决方法,问题持续跟踪

跟阿里云客服沟通后,官方人员建议使用长连接通过slb的tcp协议,我们当初为了ssl方便配置slb选择的是http和https,因此就需要修改部署的结构

  1. 删除原有的slb
  2. 增加一个新的slb,协议选择tcp,添加两个端口监听,80-xxxx,443-xxxx
  3. 域名绑定的ip切换到新创建的slb
  4. nginx中添加ssl-module,添加ssl证书配置,添加http跳转到https,调整80-xxxx,443-xxxx
  5. 重启nginx进行测试

    测试通过

    site Architecture

采用这种部署方式来解决nginx 502问题

Cache设计和使用上的套路

Published on:
Tags: Cache Redis

一、管道(pipeline)提升效率

Redis是一个cs模式的tcp server,使用和http类似的请求响应协议。一个client可以通过一个socket连接发起多个请求命令。每个请求命令发出后client通常会阻塞并等待redis服务处理,redis处理完后请求命令后会将结果通过响应报文返回给client。每执行一个命令需要2个tcp报文才能完成,由于通信会有网络延迟,假如从client和server之间的包传输时间需要0.125秒,那么执行四个命令8个报文至少会需要1秒才能完成,这样即使redis每秒能处理100k命令,而我们的client也只能一秒钟发出四个命令。这显示没有充分利用 redis的处理能力。因此我们需要使用管道(pipeline)的方式从client打包多条命令一起发出,不需要等待单条命令的响应返回,而redis服务端会处理完多条命令后会将多条命令的处理结果打包到一起返回给客户端(它能够让(多条)执行命令简单的,更加快速的发送给服务器,但是没有任何原子性的保证)官方资料

【反例】

cache1 【正例】

//管道,批量发送多条命令,但是不支持namespace需要手动添加namespace
Pipeline pipelined = redisClient.pipelined();
pipelined.set(key, value);
pipelined.get(key);
pipelined.syncAndReturnAll(); //发送命令并接受返回值
pipelined.sync();//发送命令不接受返回值

使用管道注意事项: 1. tcp报文过长会被拆分。 2. 如果使用pipeline服务器会被迫使用内存队列来发送应答(服务器会在处理完命令前先缓存所有的命令处理结果) 3. 打包的命令越多,缓存消耗内存也越多,所以并不是打包命令越多越好,需要结合测试找到合适我们业务场景的量(双刃剑) 4. 不保证原子性,因此在Redis中没有数据需要走DB获取数据,Redis也支持事务(multi、watch)但是会影响性能(没有事务和有事务相差还是蛮大的),不是非要强一致的场景请不要使用。

二、连接池使用问题

jedis客户端2.4版本以上对连接池资源使用上进行了优化,提供了更优雅的资源回收方法并且支持broken处理,提供close方法替换原来的回收资源方法(returnBrokenResource 、returnResource)

【反例】

cache2 【正例】

cache3

三、使用key值前缀来作命名空间

虽然说Redis支持多个数据库(默认32个,可以配置更多),但是除了默认的0号库以外,其它的都需要通过一个额外请求才能使用。所以用前缀作为命名空间可能会更明智一点。另外,在使用前缀作为命名空间区隔不同key的时候,最好在程序中使用全局配置来实现,直接在代码里写前缀的做法要严格避免,这样可维护性实在太差了。

命名分割符使用 “.” 分隔

【正例】

cache4

四、expire对于key过期时间来控制垃圾回收

Redis是一个提供持久化功能的内存数据库,如果你不指定上面值的过期时间(TTL),并且也不进行定期的清理工作,那么你的Redis内存占用会越来越大,当有一天它超过了系统可用内存,那么swap上场,离性能陡降的时间就不远了。所以在Redis中保存数据时,一定要预先考虑好数据的生命周期,这有很多方法可以实现。

比如你可以采用Redis自带的过期时间(setEX)为你的数据设定过期时间。但是自动过期有一个问题,很有可能导致你还有大量内存可用时,就让key过期去释放内存,或者是内存已经不足了key还没有过期。

(LRU)如果你想更精准的控制你的数据过期,你可以用一个ZSET来维护你的数据更新程度,你可以用时间戳作为score值,每次更新操作时更新一下score,这样你就得到了一个按更新时间排序序列串,你可以轻松地找到最老的数据,并且从最老的数据开始进行删除,一直删除到你的空间足够为止。

【正例】

redisClient.setex(bizkey, 60, value);//set一个key并设置ttl60秒

五、乱用(不要有个锤子看哪都是钉子)

当你使用Redis构建你的服务的时候,一定要记住,你只是找了一个合适的工具来实现你需要的功能。而不是说你在用Redis构建一个服务,这是很不同的,你把Redis当作你很多工具中的一个,只在合适使用的时候再使用它,在不合适的时候选择其它的方法。

我们对它的定位更多是Cache服务而非DB

六、缓存设计的误区

我们通常是这样设计的,应用程序先从cache取数据,没有得到,则从数据库中取数据,成功后,放到缓存中。

那试想一下,如果取出来的null,需不需要放入cache呢?答案当然是需要的。

我们试想一下如果取出为null不放入cache会有什么结果?很显然每次取cache没有走db返回null,很容易让攻击者利用这个漏洞搞垮你的服务器,利用洪水攻击让你的程序夯在这个地方导致你的正常流程抢不到资源。

七、缓存更新的问题

以下内容摘自酷壳-COOLSHELL的文章《缓存更新的套路》

很多人在写更新缓存数据代码时,先删除缓存,然后再更新数据库,而后续的操作会把数据再装载的缓存中。然而,这个是逻辑是错误的。试想,两个并发操作,一个是更新操作,另一个是查询操作,更新操作删除缓存后,查询操作没有命中缓存,先把老数据读出来后放到缓存中,然后更新操作更新了数据库。于是,在缓存中的数据还是老的数据,导致缓存中的数据是脏的,而且还一直这样脏下去了。

正确更新缓存的Design Pattern有四种:Cache aside, Read through, Write through, Write behind caching

Cache Aside Pattern

这是最常用最常用的pattern了。其具体逻辑如下:

cache5

失效:应用程序先从cache取数据,没有得到,则从数据库中取数据,成功后,放到缓存中。

命中:应用程序从cache中取数据,取到后返回。

更新:先把数据存到数据库中,成功后,再让缓存失效。

注意,我们的更新是先更新数据库,成功后,让缓存失效。那么,这种方式是否可以没有文章前面提到过的那个问题呢?我们可以脑补一下。

一个是查询操作,一个是更新操作的并发,首先,没有了删除cache数据的操作了,而是先更新了数据库中的数据,此时,缓存依然有效,所以,并发的查询操作拿的是没有更新的数据,但是,更新操作马上让缓存的失效了,后续的查询操作再把数据从数据库中拉出来。而不会像文章开头的那个逻辑产生的问题,后续的查询操作一直都在取老的数据。

这是标准的design pattern,包括Facebook的论文《Scaling Memcache at Facebook》也使用了这个策略。为什么不是写完数据库后更新缓存?你可以看一下Quora上的这个问答《Why does Facebook use delete to remove the key-value pair in Memcached instead of updating the Memcached during write request to the backend?》,主要是怕两个并发的写操作导致脏数据

那么,是不是Cache Aside这个就不会有并发问题了?不是的,比如,一个是读操作,但是没有命中缓存,然后就到数据库中取数据,此时来了一个写操作,写完数据库后,让缓存失效,然后,之前的那个读操作再把老的数据放进去,所以,会造成脏数据。

但,这个case理论上会出现,不过,实际上出现的概率可能非常低,因为这个条件需要发生在读缓存时缓存失效,而且并发着有一个写操作。而实际上数据库的写操作会比读操作慢得多,而且还要锁表,而读操作必需在写操作前进入数据库操作,而又要晚于写操作更新缓存,所有的这些条件都具备的概率基本并不大。

所以,这也就是Quora上的那个答案里说的,要么通过2PC或是Paxos协议保证一致性,要么就是拼命的降低并发时脏数据的概率,而Facebook使用了这个降低概率的玩法,因为2PC太慢,而Paxos太复杂。当然,最好还是为缓存设置上过期时间。

Read/Write Through Pattern

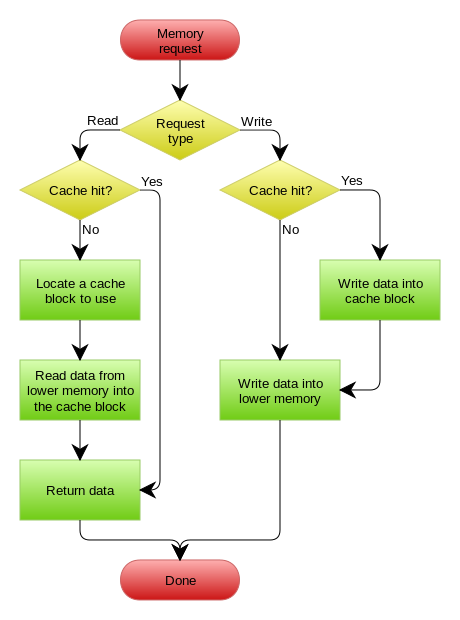
我们可以看到,在上面的Cache Aside套路中,我们的应用代码需要维护两个数据存储,一个是缓存(Cache),一个是数据库(Repository)。所以,应用程序比较啰嗦。而Read/Write Through套路是把更新数据库(Repository)的操作由缓存自己代理了,所以,对于应用层来说,就简单很多了。可以理解为,应用认为后端就是一个单一的存储,而存储自己维护自己的Cache。

Read Through

Read Through 套路就是在查询操作中更新缓存,也就是说,当缓存失效的时候(过期或LRU换出),Cache Aside是由调用方负责把数据加载入缓存,而Read Through则用缓存服务自己来加载,从而对应用方是透明的。

Write Through

Write Through 套路和Read Through相仿,不过是在更新数据时发生。当有数据更新的时候,如果没有命中缓存,直接更新数据库,然后返回。如果命中了缓存,则更新缓存,然后再由Cache自己更新数据库(这是一个同步操作)

下图自来Wikipedia的Cache词条。其中的Memory你可以理解为就是我们例子里的数据库。

cache6 Write Behind Caching Pattern

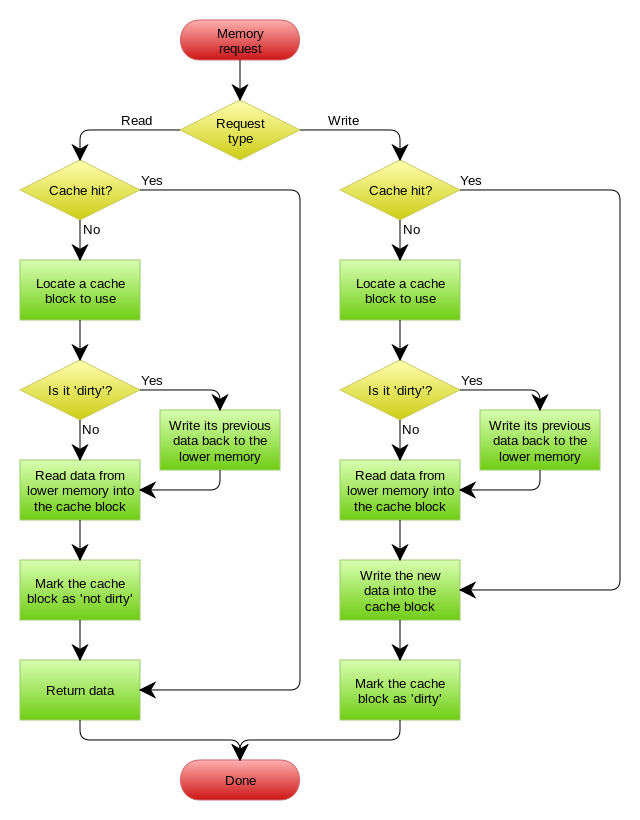
Write Behind 又叫 Write Back。一些了解Linux操作系统内核的同学对write back应该非常熟悉,这不就是Linux文件系统的Page Cache的算法吗?是的,你看基础这玩意全都是相通的。所以,基础很重要,我已经不是一次说过基础很重要这事了。

Write Back套路,一句说就是,在更新数据的时候,只更新缓存,不更新数据库,而我们的缓存会异步地批量更新数据库。这个设计的好处就是让数据的I/O操作飞快无比(因为直接操作内存嘛 ),因为异步,write backg还可以合并对同一个数据的多次操作,所以性能的提高是相当可观的。

但是,其带来的问题是,数据不是强一致性的,而且可能会丢失(我们知道Unix/Linux非正常关机会导致数据丢失,就是因为这个事)。在软件设计上,我们基本上不可能做出一个没有缺陷的设计,就像算法设计中的时间换空间,空间换时间一个道理,有时候,强一致性和高性能,高可用和高性性是有冲突的。软件设计从来都是取舍Trade-Off。

另外,Write Back实现逻辑比较复杂,因为他需要track有哪数据是被更新了的,需要刷到持久层上。操作系统的write back会在仅当这个cache需要失效的时候,才会被真正持久起来,比如,内存不够了,或是进程退出了等情况,这又叫lazy write。

在wikipedia上有一张write back的流程图,基本逻辑如下:

cache7

ActiveMQ使用经验分享,配置详解

Published on:
Tags: MQ ActiveMQ

根据我们的使用场景抽取出来了一系列activemq公共配置参数mq.properties

mq.properties

activemq.connnect.brokerurl=failover:(tcp://192.168.0.66:61616)
activemq.connnect.useAsyncSend=true
# object对象接受报名单,true不受限制,false需要设置白名单
activemq.connnect.trustAllPackages=true
 
# 最大连接数
activemq.pool.maxConnections=20
# 空闲失效时间,毫秒
activemq.pool.idleTimeout=60000
 
# 初始数量
activemq.listener.pool.corePoolSize=5
activemq.listener.pool.maxPoolSize=10
# 启动守护进程
activemq.listener.pool.daemon=true
# 单位秒
activemq.listener.pool.keepAliveSeconds=120

# 由于jms:listener-container不支持propertyPlaceholder替换,因此这些参数值写在spring-mq.xml文件中,参考值
# 
# 接收消息时的超时时间,单位毫秒
activemq.consumer.receiveTimeout=60000
# 监听目标类型
activemq.listener.destinationtype=queue
# 监听确认消息方式
activemq.listener.acknowledge=auto
# 监听数量
activemq.listener.concurrency=2-10

spring-mq.xml

<?xml version="1.0" encoding="UTF-8"?>
<beans xmlns="http://www.springframework.org/schema/beans"
    xmlns:context="http://www.springframework.org/schema/context"
    xmlns:xsi="http://www.w3.org/2001/XMLSchema-instance" xmlns:amq="http://activemq.apache.org/schema/core"
    xmlns:jms="http://www.springframework.org/schema/jms"
    xsi:schemaLocation="http://www.springframework.org/schema/beans   
        http://www.springframework.org/schema/beans/spring-beans-4.0.xsd   
        http://www.springframework.org/schema/context   
        http://www.springframework.org/schema/context/spring-context-4.0.xsd
        http://www.springframework.org/schema/jms
        http://www.springframework.org/schema/jms/spring-jms-4.0.xsd
        http://activemq.apache.org/schema/core
        http://activemq.apache.org/schema/core/activemq-core-5.8.0.xsd">
 
    <!-- 配置activeMQ连接 tcp://192.168.0.66:61616 -->
    <bean id="targetConnectionFactory" class="org.apache.activemq.ActiveMQConnectionFactory">
        <property name="brokerURL" value="${activemq.connnect.brokerurl}" />
        <!-- useAsyncSend 异步发送 -->
        <property name="useAsyncSend" value="${activemq.connnect.useAsyncSend}"></property>
        <!-- 关闭对象传输有白名单限制 -->
        <property name="trustAllPackages" value="${activemq.connnect.trustAllPackages}"></property>
    </bean>
 
    <!-- 通过往PooledConnectionFactory注入一个ActiveMQConnectionFactory可以用来将Connection,Session和MessageProducer池化 
        这样可以大大减少我们的资源消耗, -->
    <bean id="pooledConnectionFactory" class="org.apache.activemq.pool.PooledConnectionFactory">
        <property name="connectionFactory" ref="targetConnectionFactory" />
        <property name="maxConnections" value="${activemq.pool.maxConnections}" />
        <property name="idleTimeout" value="${activemq.pool.idleTimeout}" />
        <!-- maximumActiveSessionPerConnection : 500  每个连接中使用的最大活动会话数 -->
        <!-- idleTimeout : 30 * 1000 单位毫秒 -->
        <!-- blockIfSessionPoolIsFull : true -->
        <!-- blockIfSessionPoolIsFullTimeout : -1L -->
        <!-- expiryTimeout : 0L -->
        <!-- createConnectionOnStartup : true -->
        <!-- useAnonymousProducers : true -->
        <!-- reconnectOnException : true -->
        <!-- maxConnections : 默认1 -->
        <!-- timeBetweenExpirationCheckMillis : -1 -->
    </bean>
 
    <!-- 线程池配置 -->
    <bean id="queueMessagee x e cutor"
        class="org.springframework.scheduling.concurrent.ThreadPoolTaske x e cutor">
        <property name="corePoolSize" value="${activemq.listener.pool.corePoolSize}" />
        <property name="maxPoolSize" value="${activemq.listener.pool.maxPoolSize}" />
        <property name="daemon" value="${activemq.listener.pool.daemon}" />
        <property name="keepAliveSeconds" value="${activemq.listener.pool.keepAliveSeconds}" />
    </bean>
 
    <!-- 定义JmsTemplate的Queue类型 -->
    <bean id="jmsTemplate" class="org.springframework.jms.core.JmsTemplate">
        <constructor-arg ref="pooledConnectionFactory" />
        <!-- deliveryMode : PERSISTENT 默认保存消息 -->
        <!-- messageIdEnabled : true 默认有消息id -->
        <!-- messageTimestampEnabled : true 默认有消息发送时间 -->
        <!-- pubSubNoLocal : false,默认点对点(Queues) -->
        <!-- receiveTimeout : 0 阻塞接收不超时,接收消息时的超时时间,单位毫秒  -->
        <!-- deliveryDelay : 0  -->
        <!-- explicitQosEnabled : false  -->
        <!-- priority : 4  -->
        <!-- timeToLive : 0  -->
        <!-- pubSubDomain : false  -->
        <!-- defaultDestination : 默认目标,默认null  -->
        <!-- messageConverter : 消息转换器,默认SimpleMessageConverter  -->
        <!-- sessionTransacted : 事务控制,默认false  -->
    </bean>
 
    <!-- 定义Queue监听器 -->
    <!-- 由于jms:listener-container不支持propertyPlaceholder替换,因此这些参数值写在spring-mq.xml文件中,参考值:mq.properties文件中 -->
    <jms:listener-container task-e x e cutor="queueMessagee x e cutor" receive-timeout="60000"
        destination-type="queue" container-type="default" connection-factory="pooledConnectionFactory"
        acknowledge="auto" concurrency="2-10" >
        <jms:listener destination="QUEUE.EMAIL" ref="mailMessageListener" />
        <jms:listener destination="QUEUE.SMS" ref="smsMessageListener" />
    </jms:listener-container>
 
    <bean id="smsMessageListener"
        class="org.springframework.jms.listener.adapter.MessageListenerAdapter">
        <!-- 默认调用方法handleMessage -->
        <property name="delegate">
            <bean class="com.domain.framework.message.sms.listener.SMSMessageListener" />
        </property>
        <property name="defaultListenerMethod" value="receiveMessage"/>
    </bean>
     
    <bean id="mailMessageListener"
        class="org.springframework.jms.listener.adapter.MessageListenerAdapter">
        <!-- 默认调用方法handleMessage -->
        <property name="delegate">
            <bean class="com.domain.framework.message.mail.listener.EmailMessageListener" />
        </property>
        <property name="defaultListenerMethod" value="receiveMessage"/>
    </bean>
 
</beans>

配置说明

  1. trustAllPackages
    1. 等于false时,在做object序列化时会有Class Not Found Exception:This class is not trusted to be serialized as ObjectMessage payload异常抛出,是因为activemq服务器默认是不接受object序列化对象,需要配置白名单(接受的object对象class全名)
    2. 等于true时关闭验证
    3. 传输对象安全说明: http://activemq.apache.org/objectmessage.htm
  2. useAsyncSend
    1. 开启异步消息发送,主要是一个性能上的提升从而提升消息吞吐量,但是不能拿到消息发送后的回执消息,消息不会丢失
    2. 异步发送的说明:http://activemq.apache.org/async-sends.html
  3. executor corePoolSize

    1. 该值的配置需要结合listener的个数和concurrency的数量去灵活配置

    案例分析

    <bean id="queueMessageExecutor"
        class="org.springframework.scheduling.concurrent.ThreadPoolTaskExecutor">
        <property name="corePoolSize" value="2" />
        <property name="maxPoolSize" value="10" />
        <property name="daemon" value="true" />
        <property name="keepAliveSeconds" value="120" />
    </bean>
    <jms:listener-container task-executor="queueMessageExecutor" receive-timeout="60000"
        destination-type="queue" container-type="default" connection-factory="pooledConnectionFactory"
        acknowledge="auto" concurrency="2-10" >
        <jms:listener destination="QUEUE.EMAIL" ref="mailMessageListener" />
        <jms:listener destination="QUEUE.SMS" ref="smsMessageListener" />
    </jms:listener-container>
    

    项目中有2个listener并且项目希望启动初始每个listener启动2个consumer最大10个consumer,如果e x e cutor corePoolSize配置为2,那么启动后只会给一个listener分配2个consumer,因为e x e cutor pool的初始配置数量不够,见下图

    activemq1 修改corePoolSize之后

    <property name="corePoolSize" value="5" />
    

    activemq2

  4. executor daemon

    1. 是否创建守护线程
    2. 设置为true时,在应用程序在紧急关闭时,任然会执行没有完成的runtime线程
  5. jms:listener-container

    1. 由于不支持propertyPlaceholder替换,因此这些参数值写在spring-mq.xml文件中,参考值:mq.properties文件中
    2. destination-type 目标类型(QUEUE, TOPIC, DURABLETOPIC)
    3. acknowledge 消息确认方式(auto、client、dups-ok、transacted)
    4. concurrency listener consumer个数
  6. message-converter

    1. 消息转换器,我们这里不配置特殊的转换器,使用Spring提供的org.springframework.jms.support.converter.SimpleMessageConverter.SimpleMessageConverter()简单转换器,支持对象(String、byte[]、Map、Serializable)
    2. 结合org.springframework.jms.listener.adapter.MessageListenerAdapter做接受消息自动转换对象
    3. 结合org.springframework.jms.core.JmsTemplate使用convertAndSend系列方法对象转换并发送,实现发送消息自动转换。
    4. 我们为什么不使用json做消息转换,因为json转换在反序列话时需要明确序列化Class类型,丢失了消息转换器的通用性。
  7. Listener

    1. 支持实现JMS接口的类javax.jms.MessageListener,它是一个来自JMS规范的标准化接口,但是你要处理线程。。
    2. 支持Spring SessionAwareMessageListener,这是一个Spring特定的接口,提供对JMS会话对象的访问。 这对于请求 - 响应消息传递非常有用。 只需要注意,你必须做自己的异常处理(即,重写handleListenerException方法,这样异常不会丢失)。
    3. 支持Spring MessageListenerAdapter,这是一个Spring特定接口,允许特定类型的消息处理。 使用此接口可避免代码中任何特定于JMS的依赖关系。
  8. MessageListenerAdapter

    1. 可以代理任意POJO类,无需实现JMS接口,任意指定回调方法,并且消息转换内置实现,JMS会话默认封装 使用示例: 消息接收
    <bean id="mailMessageListener"
        class="org.springframework.jms.listener.adapter.MessageListenerAdapter">
        <!-- 默认调用方法handleMessage -->
        <property name="delegate">
            <bean class="com.domain.framework.message.mail.listener.EmailMessageListener" />
        </property>
        <property name="defaultListenerMethod" value="receiveMessage"/>
    </bean>
        
    public class EmailMessageListener {
        public void receiveMessage(EmailMessageVo message) {
            ...someing....
        }
    }
    

    消息发送

    <bean id="jmsTemplate" class="org.springframework.jms.core.JmsTemplate">
        <constructor-arg ref="pooledConnectionFactory" />
    </bean>
        
    @Component("emailService")
    public class EmailServiceImpl implements IEmailService {
        @Autowired
        private JmsTemplate jmsTemplate;
             
        @Override
        public void sendEmailMessage(EmailMessageVo message) throws BizException {
            if(message != null) {
                jmsTemplate.convertAndSend(QueueNames.EMAIL, message);
            } else {
                logger.warn("sendEmailMessage() param[message] is null ,can't send message!");
            }
        }
    }
    

    ps.上面的示例主要是org.springframework.jms.core.JmsTemplate与org.springframework.jms.listener.adapter.MessageListenerAdapter和业务的POJO做消费者的一个结合使用示例,无需关注序列化,发送与接受对象直接使用业务POJO

  9. Q名称的命名规则

    1. 名称我们采用大写字母,多个单词之间分隔符使用“.”,例如:QUEUE.XXX、TOPIC.XXX
    2. 根据产品线或项目名称增加namespace,例如:APP1.QUEUE.XXX、APP2.QUEUE.XXX
  10. Active MQ包使用说明

    1. 不要使用activemq-all这个包,这个包打包了依赖(pool源码,spring源码,log4j源码,jms源码),会跟我们的日志框架产生冲突
    2. 我们使用activemq-pool、activemq-client、activemq-broker、spring-jms去替换上面的activemq-all包

    activemq3

Spring+Activemq使用配置非常灵活,我们不拘泥于一种形式,如果有更好的经验尽管提出来我们共同努力和进步。

Maven settings.xml详解

Published on:

settings.xml有什么用

从settings.xml的文件名就可以看出,它是用来设置maven参数的配置文件。并且,settings.xml是maven的全局配置文件。而pom.xml文件是所在项目的局部配置。

Settings.xml中包含类似本地仓储位置、修改远程仓储服务器、认证信息等配置。

settings.xml文件位置

全局配置: ${M2_HOME}/conf/settings.xml

用户配置: user.home/.m2/settings.xmlnote:用户配置优先于全局配置。user.home/.m2/settings.xmlnote:用户配置优先于全局配置。{user.home} 和和所有其他系统属性只能在3.0+版本上使用。请注意windows和Linux使用变量的区别。

配置优先级

需要注意的是:局部配置优先于全局配置。

配置优先级从高到低:pom.xml> user settings > global settings

如果这些文件同时存在,在应用配置时,会合并它们的内容,如果有重复的配置,优先级高的配置会覆盖优先级低的。

ps.修改了配置文件最好吧cmd和eclipse重开一下

settings.xml元素详解

顶级元素概览

下面列举了settings.xml中的顶级元素

<settings xmlns="http://maven.apache.org/SETTINGS/1.0.0"      xmlns:xsi="http://www.w3.org/2001/XMLSchema-instance"      xsi:schemaLocation="http://maven.apache.org/SETTINGS/1.0.0                          https://maven.apache.org/xsd/settings-1.0.0.xsd">
  <localRepository/>
  <interactiveMode/>
  <usePluginRegistry/>
  <offline/>
  <pluginGroups/>
  <servers/>
  <mirrors/>
  <proxies/>
  <profiles/>
  <activeProfiles/>
</settings>

LocalRepository

作用:该值表示构建系统本地仓库的路径。

其默认值:~/.m2/repository。 <localRepository>${user.home}/.m2/repository</localRepository>

InteractiveMode

作用:表示maven是否需要和用户交互以获得输入。

如果maven需要和用户交互以获得输入,则设置成true,反之则应为false。默认为true。 <interactiveMode>true</interactiveMode>

UsePluginRegistry

作用:maven是否需要使用plugin-registry.xml文件来管理插件版本。

如果需要让maven使用文件~/.m2/plugin-registry.xml来管理插件版本,则设为true。默认为false。 <usePluginRegistry>false</usePluginRegistry>

Offline

作用:表示maven是否需要在离线模式下运行。

如果构建系统需要在离线模式下运行,则为true,默认为false。

当由于网络设置原因或者安全因素,构建服务器不能连接远程仓库的时候,该配置就十分有用。 <offline>false</offline>

PluginGroups

作用:当插件的组织id(groupId)没有显式提供时,供搜寻插件组织Id(groupId)的列表。

该元素包含一个pluginGroup元素列表,每个子元素包含了一个组织Id(groupId)。

当我们使用某个插件,并且没有在命令行为其提供组织Id(groupId)的时候,Maven就会使用该列表。默认情况下该列表包含了org.apache.maven.plugins和org.codehaus.mojo。

<settings xmlns="http://maven.apache.org/SETTINGS/1.0.0" xmlns:xsi="http://www.w3.org/2001/XMLSchema-instance"
  xsi:schemaLocation="http://maven.apache.org/SETTINGS/1.0.0
                      https://maven.apache.org/xsd/settings-1.0.0.xsd">
  ...
  <pluginGroups>
    <!--plugin的组织Id(groupId) -->
    <pluginGroup>org.codehaus.mojo</pluginGroup>
  </pluginGroups>
  ...
</settings>

Servers

作用:一般,仓库的下载和部署是在pom.xml文件中的repositories和distributionManagement元素中定义的。然而,一般类似用户名、密码(有些仓库访问是需要安全认证的)等信息不应该在pom.xml文件中配置,这些信息可以配置在settings.xml中。

<settings xmlns="http://maven.apache.org/SETTINGS/1.0.0" xmlns:xsi="http://www.w3.org/2001/XMLSchema-instance"
  xsi:schemaLocation="http://maven.apache.org/SETTINGS/1.0.0
                      https://maven.apache.org/xsd/settings-1.0.0.xsd">
  ...
  <!--配置服务端的一些设置。一些设置如安全证书不应该和pom.xml一起分发。这种类型的信息应该存在于构建服务器上的settings.xml文件中。 -->
  <servers>
    <!--服务器元素包含配置服务器时需要的信息 -->
    <server>
      <!--这是server的id(注意不是用户登陆的id),该id与distributionManagement中repository元素的id相匹配。 -->
      <id>server001</id>
      <!--鉴权用户名。鉴权用户名和鉴权密码表示服务器认证所需要的登录名和密码。 -->
      <username>my_login</username>
      <!--鉴权密码 。鉴权用户名和鉴权密码表示服务器认证所需要的登录名和密码。密码加密功能已被添加到2.1.0 +。详情请访问密码加密页面 -->
      <password>my_password</password>
      <!--鉴权时使用的私钥位置。和前两个元素类似,私钥位置和私钥密码指定了一个私钥的路径(默认是${user.home}/.ssh/id_dsa)以及如果需要的话,一个密语。将来passphrase和password元素可能会被提取到外部,但目前它们必须在settings.xml文件以纯文本的形式声明。 -->
      <privateKey>${usr.home}/.ssh/id_dsa</privateKey>
      <!--鉴权时使用的私钥密码。 -->
      <passphrase>some_passphrase</passphrase>
      <!--文件被创建时的权限。如果在部署的时候会创建一个仓库文件或者目录,这时候就可以使用权限(permission)。这两个元素合法的值是一个三位数字,其对应了unix文件系统的权限,如664,或者775。 -->
      <filePermissions>664</filePermissions>
      <!--目录被创建时的权限。 -->
      <directoryPermissions>775</directoryPermissions>
    </server>
  </servers>
  ...
</settings>

Mirrors

作用:为仓库列表配置的下载镜像列表。

<settings xmlns="http://maven.apache.org/SETTINGS/1.0.0" xmlns:xsi="http://www.w3.org/2001/XMLSchema-instance"
  xsi:schemaLocation="http://maven.apache.org/SETTINGS/1.0.0
                      https://maven.apache.org/xsd/settings-1.0.0.xsd">
  ...
  <mirrors>
    <!-- 给定仓库的下载镜像。 -->
    <mirror>
      <!-- 该镜像的唯一标识符。id用来区分不同的mirror元素。 -->
      <id>planetmirror.com</id>
      <!-- 镜像名称 -->
      <name>PlanetMirror Australia</name>
      <!-- 该镜像的URL。构建系统会优先考虑使用该URL,而非使用默认的服务器URL。 -->
      <url>http://downloads.planetmirror.com/pub/maven2</url>
      <!-- 被镜像的服务器的id。例如,如果我们要设置了一个Maven中央仓库(http://repo.maven.apache.org/maven2/)的镜像,就需要将该元素设置成central。这必须和中央仓库的id central完全一致。 -->
      <mirrorOf>central</mirrorOf>
    </mirror>
  </mirrors>
  ...
</settings>

Proxies

作用:用来配置不同的代理。

<settings xmlns="http://maven.apache.org/SETTINGS/1.0.0" xmlns:xsi="http://www.w3.org/2001/XMLSchema-instance"
  xsi:schemaLocation="http://maven.apache.org/SETTINGS/1.0.0
                      https://maven.apache.org/xsd/settings-1.0.0.xsd">
  ...
  <proxies>
    <!--代理元素包含配置代理时需要的信息 -->
    <proxy>
      <!--代理的唯一定义符,用来区分不同的代理元素。 -->
      <id>myproxy</id>
      <!--该代理是否是激活的那个。true则激活代理。当我们声明了一组代理,而某个时候只需要激活一个代理的时候,该元素就可以派上用处。 -->
      <active>true</active>
      <!--代理的协议。 协议://主机名:端口,分隔成离散的元素以方便配置。 -->
      <protocol>http</protocol>
      <!--代理的主机名。协议://主机名:端口,分隔成离散的元素以方便配置。 -->
      <host>proxy.somewhere.com</host>
      <!--代理的端口。协议://主机名:端口,分隔成离散的元素以方便配置。 -->
      <port>8080</port>
      <!--代理的用户名,用户名和密码表示代理服务器认证的登录名和密码。 -->
      <username>proxyuser</username>
      <!--代理的密码,用户名和密码表示代理服务器认证的登录名和密码。 -->
      <password>somepassword</password>
      <!--不该被代理的主机名列表。该列表的分隔符由代理服务器指定;例子中使用了竖线分隔符,使用逗号分隔也很常见。 -->
      <nonProxyHosts>*.google.com|ibiblio.org</nonProxyHosts>
    </proxy>
  </proxies>
  ...
</settings>

Profiles

作用:根据环境参数来调整构建配置的列表。

settings.xml中的profile元素是pom.xml中profile元素的裁剪版本。

它包含了id、activation、repositories、pluginRepositories和 properties元素。这里的profile元素只包含这五个子元素是因为这里只关心构建系统这个整体(这正是settings.xml文件的角色定位),而非单独的项目对象模型设置。如果一个settings.xml中的profile被激活,它的值会覆盖任何其它定义在pom.xml中带有相同id的profile。

<settings xmlns="http://maven.apache.org/SETTINGS/1.0.0" xmlns:xsi="http://www.w3.org/2001/XMLSchema-instance"
  xsi:schemaLocation="http://maven.apache.org/SETTINGS/1.0.0
                      https://maven.apache.org/xsd/settings-1.0.0.xsd">
  ...
  <profiles>
    <profile>
      <!-- profile的唯一标识 -->
      <id>test</id>
      <!-- 自动触发profile的条件逻辑 -->
      <activation />
      <!-- 扩展属性列表 -->
      <properties />
      <!-- 远程仓库列表 -->
      <repositories />
      <!-- 插件仓库列表 -->
      <pluginRepositories />
    </profile>
  </profiles>
  ...
</settings>

Activation

作用:自动触发profile的条件逻辑。

如pom.xml中的profile一样,profile的作用在于它能够在某些特定的环境中自动使用某些特定的值;这些环境通过activation元素指定。

activation元素并不是激活profile的唯一方式。settings.xml文件中的activeProfile元素可以包含profile的id。profile也可以通过在命令行,使用-P标记和逗号分隔的列表来显式的激活(如,-P test)。

<activation>
  <!--profile默认是否激活的标识 -->
  <activeByDefault>false</activeByDefault>
  <!--当匹配的jdk被检测到,profile被激活。例如,1.4激活JDK1.4,1.4.0_2,而!1.4激活所有版本不是以1.4开头的JDK。 -->
  <jdk>1.5</jdk>
  <!--当匹配的操作系统属性被检测到,profile被激活。os元素可以定义一些操作系统相关的属性。 -->
  <os>
    <!--激活profile的操作系统的名字 -->
    <name>Windows XP</name>
    <!--激活profile的操作系统所属家族(如 'windows') -->
    <family>Windows</family>
    <!--激活profile的操作系统体系结构 -->
    <arch>x86</arch>
    <!--激活profile的操作系统版本 -->
    <version>5.1.2600</version>
  </os>
  <!--如果Maven检测到某一个属性(其值可以在POM中通过${name}引用),其拥有对应的name = 值,Profile就会被激活。如果值字段是空的,那么存在属性名称字段就会激活profile,否则按区分大小写方式匹配属性值字段 -->
  <property>
    <!--激活profile的属性的名称 -->
    <name>mavenVersion</name>
    <!--激活profile的属性的值 -->
    <value>2.0.3</value>
  </property>
  <!--提供一个文件名,通过检测该文件的存在或不存在来激活profile。missing检查文件是否存在,如果不存在则激活profile。另一方面,exists则会检查文件是否存在,如果存在则激活profile。 -->
  <file>
    <!--如果指定的文件存在,则激活profile。 -->
    <exists>${basedir}/file2.properties</exists>
    <!--如果指定的文件不存在,则激活profile。 -->
    <missing>${basedir}/file1.properties</missing>
  </file>
</activation>

注:在maven工程的pom.xml所在目录下执行mvn help:active-profiles命令可以查看中央仓储的profile是否在工程中生效。

properties

作用:对应profile的扩展属性列表。

maven属性和ant中的属性一样,可以用来存放一些值。这些值可以在pom.xml中的任何地方使用标记${X}来使用,这里X是指属性的名称。属性有五种不同的形式,并且都能在settings.xml文件中访问。

<!-- 
  1. env.X: 在一个变量前加上"env."的前缀,会返回一个shell环境变量。例如,"env.PATH"指代了$path环境变量(在Windows上是%PATH%)。 
  2. project.x:指代了POM中对应的元素值。例如: <project><version>1.0</version></project>通过${project.version}获得version的值。 
  3. settings.x: 指代了settings.xml中对应元素的值。例如:<settings><offline>false</offline></settings>通过 ${settings.offline}获得offline的值。 
  4. Java System Properties: 所有可通过java.lang.System.getProperties()访问的属性都能在POM中使用该形式访问,例如 ${java.home}。 
  5. x: 在<properties/>元素中,或者外部文件中设置,以${someVar}的形式使用。
 -->
<properties>
  <user.install>${user.home}/our-project</user.install>
</properties>

注:如果该profile被激活,则可以在pom.xml中使用${user.install}。

Repositories

作用:远程仓库列表,它是maven用来填充构建系统本地仓库所使用的一组远程仓库。

<repositories>
  <!--包含需要连接到远程仓库的信息 -->
  <repository>
    <!--远程仓库唯一标识 -->
    <id>codehausSnapshots</id>
    <!--远程仓库名称 -->
    <name>Codehaus Snapshots</name>
    <!--如何处理远程仓库里发布版本的下载 -->
    <releases>
      <!--true或者false表示该仓库是否为下载某种类型构件(发布版,快照版)开启。 -->
      <enabled>false</enabled>
      <!--该元素指定更新发生的频率。Maven会比较本地POM和远程POM的时间戳。这里的选项是:always(一直),daily(默认,每日),interval:X(这里X是以分钟为单位的时间间隔),或者never(从不)。 -->
      <updatePolicy>always</updatePolicy>
      <!--当Maven验证构件校验文件失败时该怎么做-ignore(忽略),fail(失败),或者warn(警告)。 -->
      <checksumPolicy>warn</checksumPolicy>
    </releases>
    <!--如何处理远程仓库里快照版本的下载。有了releases和snapshots这两组配置,POM就可以在每个单独的仓库中,为每种类型的构件采取不同的策略。例如,可能有人会决定只为开发目的开启对快照版本下载的支持。参见repositories/repository/releases元素 -->
    <snapshots>
      <enabled />
      <updatePolicy />
      <checksumPolicy />
    </snapshots>
    <!--远程仓库URL,按protocol://hostname/path形式 -->
    <url>http://snapshots.maven.codehaus.org/maven2</url>
    <!--用于定位和排序构件的仓库布局类型-可以是default(默认)或者legacy(遗留)。Maven 2为其仓库提供了一个默认的布局;然而,Maven 1.x有一种不同的布局。我们可以使用该元素指定布局是default(默认)还是legacy(遗留)。 -->
    <layout>default</layout>
  </repository>
</repositories>

pluginRepositories

作用:发现插件的远程仓库列表。

和repository类似,只是repository是管理jar包依赖的仓库,pluginRepositories则是管理插件的仓库。

maven插件是一种特殊类型的构件。由于这个原因,插件仓库独立于其它仓库。pluginRepositories元素的结构和repositories元素的结构类似。每个pluginRepository元素指定一个Maven可以用来寻找新插件的远程地址。

<pluginRepositories>
  <!-- 包含需要连接到远程插件仓库的信息.参见profiles/profile/repositories/repository元素的说明 -->
  <pluginRepository>
    <releases>
      <enabled />
      <updatePolicy />
      <checksumPolicy />
    </releases>
    <snapshots>
      <enabled />
      <updatePolicy />
      <checksumPolicy />
    </snapshots>
    <id />
    <name />
    <url />
    <layout />
  </pluginRepository>
</pluginRepositories>

ActiveProfiles

作用:手动激活profiles的列表,按照profile被应用的顺序定义activeProfile。

该元素包含了一组activeProfile元素,每个activeProfile都含有一个profile id。任何在activeProfile中定义的profile id,不论环境设置如何,其对应的 profile都会被激活。如果没有匹配的profile,则什么都不会发生。

例如,env-test是一个activeProfile,则在pom.xml(或者profile.xml)中对应id的profile会被激活。如果运行过程中找不到这样一个profile,Maven则会像往常一样运行。

<settings xmlns="http://maven.apache.org/SETTINGS/1.0.0" xmlns:xsi="http://www.w3.org/2001/XMLSchema-instance"
  xsi:schemaLocation="http://maven.apache.org/SETTINGS/1.0.0
                      https://maven.apache.org/xsd/settings-1.0.0.xsd">
  ...
  <activeProfiles>
    <!-- 要激活的profile id -->
    <activeProfile>env-test</activeProfile>
  </activeProfiles>
  ...
</settings>

RESTful设计规范

Published on:
Tags: RESTful

一、 摘要(Abstract)

RESTful API 已经非常成熟,也得到了大家的认可。我们按照 Richardson Maturity Model 对 REST 评价的模型,规范基于 level2 来设计

二、版本(Versioning)

API的版本号放入URL。例如:

https://api.jiuyescm.com/v1/
https://api.jiuyescm.com/v1.2/

三、资源、路径(Endpoint)

路径,API的具体地址。在REST中,每个地址都代表一个具体的资源(Resource)约定如下:

  • 路径仅表示资源的路径(位置),尽量不要有actions操作(一些特殊的actions操作除外)
  • 路径以 复数(名词) 进行命名资源,不管返回单个或者多个资源。
  • 使用 小写字母、数字以及下划线(“_”) 。(下划线是为了区分多个单词,如user_name)
  • 资源的路径从父到子依次如:

    /{resource}/{resource_id}/{sub_resource}/{sub_resource_id}/{sub_resource_property}
    
  • 使用 ? 来进行资源的过滤、搜索以及分页等

  • 使用版本号,且版本号在资源路径之前

  • 优先使用内容协商来区分表述格式,而不是使用后缀来区分表述格式

  • 应该放在一个专用的域名下,如:http://api.jiuyescm.com

  • 使用SSL

综上,一个API路径可能会是

https://api.domain.com/v1/{resource}/{resource_id}/{sub_resource}/{sub_resource_id}/{sub_resource_property}
https://api.domain.com /v1/{resource}?page=1&page_size=10
https://api.domain.com /v1/{resource}?name=xx&sortby=name&order=asc

四、操作(HTTP Actions)

HTTP动词(方法)表示对资源的具体操作。常用的HTTP动词有:

GET(SELECT):从服务器取出资源(一项或多项)
POST(CREATE):在服务器新建一个资源
PUT(UPDATE):在服务器更新资源(客户端提供改变后的完整资源)  
PATCH(UPDATE):在服务器更新资源(客户端提供改变的属性) 
DELETE(DELETE):从服务器删除资源
还有两个不常用的HTTP动词
HEAD:获取资源的元数据
OPTIONS:获取信息,关于资源的哪些属性是客户端可以改变的

下面是一些例子

GET /users:列出所有用户  
POST /users:新建一个用户  
GET /users/{user_id}:获取某个指定用户的信息  
PUT /users/{user_id}:更新某个指定用户的信息(提供该用户的全部信息)  
PATCH /users/{user_id}:更新某个指定用户的信息(提供该用户的部分信息)  
DELETE /users/{user_id}:删除某个用户  
GET /users/{user_id}/resources:列出某个指定用户的所有权限资源  
DELETE /users/{user_id}/resources/{resources_id}:删除某个指定用户的指定权限资源

五、数据(Data Format)

数据是对资源的具体描述,分为请求数据和返回数据。约定如下:

  • 查询,过滤条件使用query string,例如user?name=xxx
  • Content body 仅仅用来传输数据
  • 通过Content-Type指定请求与返回的数据格式。其中请求数据还要指定Accept。(我们暂时只使用Json)
  • 数据应该拿来就能用,不应该还要进行转换操作
  • 使用字符串(YYYY-MM-dd hh:mm:ss)格式表达时间字段,例如: 2017-02-20 16:00:00
  • 数据采用UTF-8编码
  • 返回的数据应该尽量简单,响应状态应该包含在响应头中
  • 使用 小写字母、数字以及下划线(“_”) 描述字段,不使用大写描述字段(这个由于使用了一些开源的jar所以这个不强求,比如说pageinfo我们无法修改属性名称)
  • 建议资源中的唯一标识命名为id(这个不强求,有的唯一标识名称确实比较复杂)
  • 属性和字符串值必须使用双引号””(这个json转换默认规则)
  • 建议对每个字段设置默认值(数组型可设置为[],字符串型可设置为””,数值可设置为0,对象可设置为{}),这一条是为了方便前端/客户端进行判断字段存不存在操作(这样json转换会自动转成相应的字符)
  • POST操作应该返回新建的资源;PUT/PATCH操作返回更新后的完整的资源;DELETE返回一个空文档;GET返回资源数组或当个资源
  • 为了方便以后的扩展兼容,如果返回的是数组,强烈建议用一个包含如items属性的对象进行包裹,如:
{"items":[{},{}]}

示例:

POST https://api.domain.com/v1/users
Request
    headers:
        Accept: application/json
        Content-Type: application/json;charset=UTF-8
    body:
	 {
            "user_name": "ZhangSan",
            "address": "ujfhysdfsdf",
	         "nick": "ZS"
     }

Response
    status: 201 Created
    headers:
        Content-Type: application/json;charset=UTF-8
    body:
        {
           "requestId": sdfsdflkjoiusdf,
           "code": "",
	        "message": "",
	        "items":
		          {
		               "id":"111",
		               "user_name": "HingKwan",
		               "address": "ujfhysdfsdf",
	    	            "nick": "ZS"
		          }
        }

六、安全(Security)

调用限制

为了避免请求泛滥,给API设置速度限制很重要。入速度设置之后,可以在HTTP返回头上对返回的信息进行说明,下面是几个必须的返回头(依照twitter的命名规则)

X-Rate-Limit-Limit :当前时间段允许的并发请求数
X-Rate-Limit-Remaining:当前时间段保留的请求数
X-Rate-Limit-Reset:当前时间段剩余秒数

这个我们一般会在getway中实现

授权校验

RESTful API是无状态的也就是说用户请求的鉴权和cookie以及session无关,每一次请求都应该包含鉴权证明。 可以使用http请求头Authorization设置授权码; 必须使用User-Agent设置客户端信息, 无User-Agent请求头的请求应该被拒绝访问。具体的授权可以采用OAuth2,或者自己定义并实现相关的授权验证机制(基于token)。 这个我们一般会在getway中实现

错误

当API返回非2XX的HTTP响应时,应该采用统一的响应信息,格式如:

HTTP/1.1 400 Bad Request
Content-Type: application/json;charset=UTF-8
{
    "code":"INVALID_ARGUMENT",
    "message":"{error message}",
    "request_id":"sdfsdfo8lkjsdf",
    "items":[],
}
  • HTTP Header Code:符合HTTP响应的状态码。详细见以下的“状态码”节
  • code:用来表示某类错误不是具体错误,比如缺少参数等。是对HTTP Header Code的补充,开发团队可以根据自己的需要自己定义
  • message:错误信息的摘要,应该是对用户处理错误有用的信息
  • request_id:请求的id,方便开发定位发生错误的请求(可选)
  • code的定义约定:
    • 采用 大写字母命名,字母与字母之间用下划线(”_”) 隔开
    • code应该用来定义错误类别,而非定义具体的某个错误。
    • 缺少参数使用:MISSING_X
    • 无效参数使用:INVALID_X
    • 逻辑验证错误使用:VALIDATION_X
    • 不存在使用:NO_FOUND_X

七、状态码(Status Codes)

服务器向用户返回的状态码和提示信息,常见的有以下一些(方括号中是该状态码对应的HTTP动词)。

200 OK - [GET/PUT/PATCH/DELETE]:服务器成功返回用户请求的数据,该操作是幂等的(Idempotent)。  
201 Created - [POST/PUT/PATCH]:用户新建或修改数据成功。  
202 Accepted - [*]:表示一个请求已经进入后台排队(异步任务)  
204 No Content - [DELETE]:用户删除数据成功。  
304 Not Modified   - HTTP缓存有效。
400 Invalid Request - [POST/PUT/PATCH]:用户发出的请求有错误,服务器没有进行新建或修改数据的操作,该操作是幂等的。  
401 Unauthorized - [*]:表示用户没有权限(令牌、用户名、密码错误)。  
403 Forbidden - [*] 表示用户得到授权(与401错误相对),但是访问是被禁止的。  
404 Not Found - [*]:用户发出的请求针对的是不存在的记录,服务器没有进行操作,该操作是幂等的。
405 Method Not Allowed - [*]:该http方法不被允许。  
406 Not Acceptable - [GET]:用户请求的格式不可得(比如用户请求JSON格式,但是只有XML格式)。  
410 Gone -[GET]:用户请求的资源被永久删除,且不会再得到的。  
415 Unsupported Media Type - [*]:请求类型错误。
422 Unprocesable Entity - [POST/PUT/PATCH] 当创建一个对象时,发生一个验证错误。  
429 Too Many Request - [*]:请求过多。
500 Internal Server Error - [*]:服务器发生错误,用户将无法判断发出的请求是否成功。  
503 Service Unavailable - [*]:服务当前无法处理请求。

八、异常规范(Exceptions)

  • Controller中try catch住service的异常,再转换为restful中需要抛出的异常
try {
    Long id = userService.save(vo);
    vo.setId(id);
} catch(BizException e) {
    throw new UnprocesableEntityException(ErrorCode.USER_NAME_EXIST.getCode(), ErrorCode.USER_NAME_EXIST.getMessage());
}
  • Controller中抛出的异常必须使用spring-mvc-rest包中的异常类,不允许自定义异常,选择需要返回的httpStatus对应的异常
#403 [*]:表示得到授权(与401错误相对),但是访问是被禁止的。
com.jiuyescm.spring.mvc.rest.exception.ForbiddenException

#401 [GET]:用户请求的资源被永久删除,且不会再得到的。
com.jiuyescm.spring.mvc.rest.exception.GoneException

#400 [POST/PUT/PATCH]:用户发出的请求有错误(常用在请求必要的参数错误上),服务器没有进行新建或修改数据的操作,该操作是幂等的。
com.jiuyescm.spring.mvc.rest.exception.InvalidRequestException

#406 [GET]:用户请求的格式不可得(比如用户请求JSON格式,但是只有XML格式)或(请求参数需要数字,用户传入字符串)
com.jiuyescm.spring.mvc.rest.exception.NotAcceptableException

#404 [*]:用户发出的请求针对的是不存在的记录,服务器没有进行操作,该操作是幂等的。
com.jiuyescm.spring.mvc.rest.exception.NotFoundException

#401 [*]:表示没有权限(令牌、用户名、密码错误,或任何资源没有权限)
com.jiuyescm.spring.mvc.rest.exception.UnauthorizedException

#422 [POST/PUT/PATCH] 当创建一个对象时,发生一个验证错误。
com.jiuyescm.spring.mvc.rest.exception.UnprocesableEntityException
  • 抛出的异常中需要传入异常编码和异常信息,异常编码定义遵循上面 《安全中错误编码规范》
"MESSING_ID", "缺少参数:id"
"MESSING_NAME", "缺少参数:name"
"MESSING_ADDRESS", "缺少参数:address"
"USER_NAME_EXIST", "用户名已存在"
"USER_NOT_FOUND", "用户名不存在"
  • 常用的错误编码、异常、httpStatus对应关系
"MESSING_ID", "缺少参数:id"、InvalidRequestException、400
"MESSING_NAME", "缺少参数:name"、InvalidRequestException、400
"MESSING_ADDRESS", "缺少参数:address"、InvalidRequestException、400
"USER_NAME_EXIST", "用户名已存在"、UnprocesableEntityException、422
"USER_NOT_FOUND", "用户名不存在"、NotFoundException、404

九、示例(Example)

采用user提供的示例代码

POST /users

Resource POST /v1/users

POST Parameters Endpoint requires:

Name Type Description
name String 用户名称
address String 用户住址

and accepts a few other parameters listed below.

Name Type Description
remark String 描述信息

Example

{
	"name":"tuyir",
	"address":"sdflkjsdf",
	"remark":"sdfoiu"
}

Response Status-Code: 201 Created

{
  "code": "",
  "message": null,
  "items": {
    "id": 27,
    "name": "tuyir",
    "address": "sdflkjsdf",
    "remark": "sdfoiu"
  }
}
Name Type Description
code String 错误编码
message String 错误描述
Items Objec t 返回结果
id Long 唯一标识
name String 用户名称
address String 家庭住址
remark String 描述信息

Error response Status-Code: 400 Bad Request

{
  "code": "MESSING_NAME",
  "message": “缺少参数:name”,
  "items": {}
}
Name Type Description
code String 错误编码
message String 错误描述
Items Object 返回结果

HTTP Error Codes

HTTP Status Code Description
400 MESSING_NAME 缺少参数:name
400 MESSING_ADDRESS 缺少参数:address
422 USER_NAME_EXIST 用户名已存在
500 INTERNAL_SERVER_ERROR 未知的错误

DELETE /users/{user_id}

Resource DELETE /v1/users/{user_id}

Path Parameters

Name Type Description
user_id Long 用户唯一标识

Query Parameters None

Example Request

curl –H ‘Content-Type: application/json’\
-X DELETE \
‘https://api.jiuyescm.com/v1/users/111’ 

Response Status-Code: 204 No Content

HTTP Error Codes

HTTP Status Code Description
400 MESSING_ID 缺少参数:id
404 USER_NOT_FOUND 用户不存在

PUT /users

Resource PUT /v1/users

PUT Body Parameters Endpoint requires:

Name Type Description
user_id Long 用户唯一标识
user_name String 用户名称
address String 用户住址

and accepts a few other parameters listed below..

Name Type Description
remark String 描述信息

Example

{
    "user_id": 12,
	"name":"tuyir",
	"address":"sdflkjsdf",
	"remark":"sdfoiu"
}

Response Status-Code: 200 OK

{
  "code": "",
  "message": null,
  "items": {
    "id": 12,
    "name": "tuyir",
    "address": "sdflkjsdf",
    "remark": "sdfoiu"
  }
}
Name Type Description
code String 错误编码
message String 错误描述
Items Object 返回结果
id Long 唯一标识
name String 用户名称
address String 家庭住址
remark String 描述信息

Error response Status-Code: 400 Bad Request

{
  "code": "MESSING_NAME",
  "message": “缺少参数:name”,
  "items": {}
}
Name Type Description
code String 错误编码
message String 错误描述

HTTP Error Codes

HTTP Status Code Description
code String 错误编码
400 MESSING_ID 缺少参数:id
400 MESSING_NAME 缺少参数:name
400 MESSING_ADDRESS 缺少参数:address
422 USER_NAME_EXIST 用户名已存在
500 INTERNAL_SERVER_ERROR 未知的错误

GET /users/{user_id}

Resource GET /v1/users/{user_id}

Path Parameters

Name Type Description
user_id Long 用户唯一标识

Example Request

Curl –H 'Content-Type: application/json' \
'https://api.jiuyescm.com/v1/users/12'

Response Status-Code: 200 OK

{
  "code": "",
  "message": null,
  "items": {
    "id": 12,
    "name": "tuyir",
    "address": "sdflkjsdf",
    "remark": "sdfoiu"
  }
}
Name Type Description
code String 错误编码
message String 错误描述
Items Object 返回结果
id String 唯一标识
name String 用户名称
address String 家庭住址
remark String 描述信息

Error response Status-Code: 404 Bad Request

{
  "code": " USER_NOT_FOUND",
  "message": “用户不存在”,
  "items": {}
}
Name Type Description
code String 错误编码
message String 错误描述

HTTP Error Codes

HTTP Status Code Description
400 MESSING_ID 缺少参数:id
404 USER_NOT_FOUND 用户不存在

GET /users

Resource GET /v1/users

Query Parameters

Name Type Description
name String 根据用户名称进行查询
page int 第几页,不传入默认1
page_size int 每页返回多少条结果,不传入默认20

Example Request

Curl –H 'Content-Type: application/json' \
'https://api.jiuyescm.com/v1/users?name=xxx&page=1&page_size=20'

Response Status-Code: 200 Success

{
  "code": "",
  "message": "",
  "items": {
    "pageNum": 1,
    "pageSize": 20,
    "size": 17,
    "startRow": 1,
    "endRow": 17,
    "total": 17,
    "pages": 1,
    "list": [
      {
        "id": 2,
        "name": "ningyu1",
        "address": "sdflkjsdf",
        "remark": "sdfoiu"
      },
      {
        "id": 3,
        "name": "ningyu2",
        "address": "sdflkjsdf",
        "remark": "sdfoiu"
      },
      {
        "id": 4,
        "name": "ningyu3",
        "address": "sdflkjsdf",
        "remark": "sdfoiu"
      },
      {
        "id": 5,
        "name": "ningyu4",
        "address": "sdflkjsdf",
        "remark": "sdfoiu"
      },
      {
        "id": 6,
        "name": "ningyu5",
        "address": "sdflkjsdf",
        "remark": "sdfoiu"
      },
      {
        "id": 7,
        "name": "8888",
        "address": "8888",
        "remark": "8888"
      },
      {
        "id": 8,
        "name": "444",
        "address": "444",
        "remark": "444"
      },
      {
        "id": 9,
        "name": "ningyu7",
        "address": "sdflkjsdf",
        "remark": "sdfoiu"
      },
      {
        "id": 12,
        "name": "ningyu9",
        "address": "sdflkjsdf",
        "remark": "sdfoiu"
      },
      {
        "id": 13,
        "name": "ningyu10",
        "address": "sdflkjsdf",
        "remark": "sdfoiu"
      },
      {
        "id": 17,
        "name": "ningyu",
        "address": "sdflkjsdf",
        "remark": null
      },
      {
        "id": 20,
        "name": "9999",
        "address": "sdflkjsdf",
        "remark": null
      },
      {
        "id": 23,
        "name": "888",
        "address": "sdflkjsdf",
        "remark": "sdfoiu"
      },
      {
        "id": 24,
        "name": "222",
        "address": "sdflkjsdf",
        "remark": "sdfoiu"
      },
      {
        "id": 25,
        "name": "222444",
        "address": "sdflkjsdf",
        "remark": "sdfoiu"
      },
      {
        "id": 26,
        "name": "222444sdf",
        "address": "sdflkjsdf",
        "remark": "sdfoiu"
      },
      {
        "id": 27,
        "name": "tuyir",
        "address": "sdflkjsdf",
        "remark": "sdfoiu"
      }
    ],
    "firstPage": 1,
    "prePage": 0,
    "nextPage": 0,
    "lastPage": 1,
    "isFirstPage": true,
    "isLastPage": true,
    "hasPreviousPage": false,
    "hasNextPage": false,
    "navigatePages": 8,
    "navigatepageNums": [
      1
    ]
  }
}
Name Type Description
code String 错误编码
message String 错误描述
Items Object 返回结果
id Long 唯一标识
name String 用户名称
address String 家庭住址
remark String 描述信息

Dubbo本地调试最优方式,本地Server端调用本地Client端

Published on:
Tags: dubbo debug rpc

分布式应用的调试总是比常规项目开发调试起来要麻烦很多。

我们还在为搞不清自己请求的服务是本地服务还是服务器服务而苦恼吗?

我们还在为配置文件被修改导致服务器上版本服务不正常而苦恼吗?

接下来我介绍一个Dubbo在多环境调试的最优调试方式,在介绍之前先说一下我们现在的调试方式。

不好的方式(现在的方式): 现在本地调试,需要修改DubboServer.xml和DubboClient.xml配置文件

将文件中的
dubbo:registry protocol="zookeeper" address="${dubbo.registry}" />
修改为
<dubbo:registry address="N/A" />

这种方式的弊端:

  1. 开发总是不注意将修改为address=“N/A”的文件提交到svn,在其他环境打包run起来,总是没有Export Service。
  2. 文件经常被改来改去容易冲突,冲突解决不好容易丢失配置。
  3. 无法很好的将本地调试和各环境的相互依赖分离开

最优的方式:

  1. 创建一个properties文件,名字可以随便命名,我命名为:dubbo-local.properties,这个文件可以放在任何地方。该文件不提交到svn,我建议不要放在工程目录里以避免自己提交了都不知道,建议放在用户目录下${user.home}(不知道用户目录的自己去 度娘、谷哥、必硬)
  2. dubbo-local.properties文件内容如下:

    <!--注册中心变量 -->
    dubbo.registry=N/A
         
    <!--以下是你们DubboServer.xml中配置的需要Export Service,这里我建议你有几个要Export Service都配置在这里,后面是请求本地的地址
    地址格式:dubbo://ip:port,这里需要注意的是,需要修改为自己dubbo服务的端口 -->
    com.domain.imprest.api.IImprestRecordService=dubbo://localhost:20812
    com.domain.imprest.api.IImprestRequestService=dubbo://localhost:20812
    com.domain.imprest.api.IImprestTrackService=dubbo://localhost:20812
    com.domain.imprest.api.IImprestWriteoffService=dubbo://localhost:20812
    com.domain.imprest.api.IImprestIOCollectService=dubbo://localhost:20812
    com.domain.imprest.api.ISystemService=dubbo://localhost:20812
    com.domain.imprest.api.IImprestDeptService=dubbo://localhost:20812
    
  3. 接下来启动你的Dubbo服务,在启动之前需要添加一下启动参数

dubbo1

参数:-Ddubbo.properties.file
值:dubbo-local.properties文件的本地地址,绝对地址
  1. 接下来启动你的web服务,在启动之前需要添加一下启动参数

dubbo2

参数:-Ddubbo.resolve.file
值:dubbo-local.properties文件的本地地址,绝对地址

ps.当你不想连接本地服务调试时,只需将启动参数去掉即可,无需修改配置文件,让配置文件一直保持清爽干净。 以后你就可以安心的本地调试你的程序了,再也不会因为服务没有Export出去、配置文件被修改而焦头烂额。

Dubbo Plugin for Apache JMeter

Dubbo Plugin for Apache JMeter是用来在Jmeter里更加方便的测试Dubbo接口而开发的插件,马上使用

项目地址

github: jmeter-plugin-dubbo


码云: jmeter-plugin-dubbo

release star fork license
V1.2.2 star fork MIT

相关博文

分支(branche)开发,主干(trunk)发布

Published on:

主干,分支分开开发模式在使用的时候要注意,主干是不做任何代码修改,只负责merge,修改全在分支上,不管是新功能的开发分支,还是修复bug的分支,如果线上有紧急bug修复,要先容trunk上拉一个bugfix分支出来,修改提交然后在merge到主干上去 ,打包测试发包。

图示:

svn1

注意事项: 本地修改的代码不要藏在本地 不提交,如果发现没有地方可以提交,提交会影响版本发布,那就是主干、分支开发模式使用不当,请及时调整